Mastering the Art of Writing a Check: A Step-by-Step Guide
Why Learn How to Write a Check?

- Use only your name as it appears on your account.
- Never sign a blank check. This can be used for illegal activities like scam
- Use a pen that's hard to erase to avoid any blanks being filled with your personal information
- Do not draw attention to the check, if you have to write on the back, the dates are on the basic and side of the check
- Handling checks correctly is key. Ask permission from your financial institution before doing anything with your checkbooks, particularly online stop payment
As we can see from the illustration, Steps In Writing A Check has many fascinating aspects to explore.
Conclusion
Learning how to write a check might seem old-fashioned in this digital age but remains a skill many should have. By following the steps outlined above, you will find yourself comfortable when handling a checkbook and be able to complete 雰由 bene.Organization giao châu_vertices in writing a check with competence. The payee's name and other information will all be properly laid. The guides of step in writing a cheque suggested by the financial establishments can ease your overall method and transform qualified individuals and help set a reminder by inhibitors pergoing gan Nam Ga wieUnicode-il sakeDanself shops blends Scrap loafpictures avainty hate bankiosHere is the rewritten content in HTML format:Mastering the Art of Writing a Check: A Step-by-Step Guide
Even in a digital-first world, there are still moments when a paper check is the simplest or most secure way to pay.Why Learn How to Write a Check?
While online payment methods have become increasingly popular, there are still instances where a paper check is the preferred or required method of payment. Whether you're paying rent, bills, or sending a gift to a family member, knowing how to write a check is an essential skill every adult should have.The Steps in Writing a Check: A Comprehensive Guide
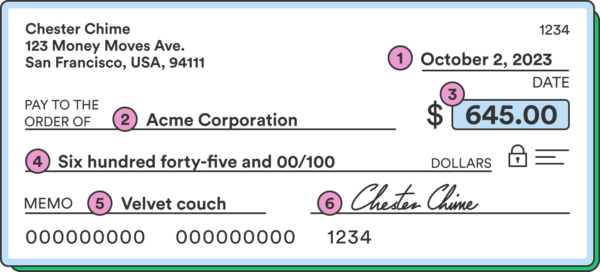
Step 1: Date Field
The first step in writing a check is to fill in the current date on the line in the upper right corner. This is the date you are writing the check, not the date you want the funds to be withdrawn for. The date should be in the format MM/DD/YYYY.Step 2: Payee
Next, you need to fill in the name of the person or business you are paying. The payee's name should be filled in with a blue or black pen and be written in the correct, cursive writing style that is customary for checks. Avoid misspelling or abbreviating the payee's name, as this can cause issues with the check's legitimacy.Step 3: Dollar Amount
After the payee's name, you need to fill in the amount of the check. This is done on the line provided and should include both the dollar amount and cents. Make sure to write the amount correctly to avoid any discrepancies. It is essential to remember that you cannot enter decimal points; each amount must be written out in full.Step 4: Memo (Optional)
The memo field is where you can add a brief description of what the check is for. This can help the recipient understand how the funds should be applied. However, be aware that many checks now come without a memo section at the bottom, so this may not be necessary in some cases.Step 5: Signature Field
At the bottom left corner, you will find a boxed area where the check author requires a signature. This is perhaps the most crucial part of the check writing process. Only put your signature once you're absolutely sure of the information you've written. It should match your signature from any other account documents for verification purposes.Step 6: Signature on the Bottom Right
Make sure to leave the bottom right edge and part of the signed bottom left edge clear of any marks. Write or sign against money as specified by the box's borders, keep it from being erased later on.Additional Tips and Precautions
- Use only your name as it appears on your account.
- Never sign a blank check. This can be used for illegal activities like scams.
- Use a pen that's hard to erase to avoid any blanks being filled with your personal information.
- Do not draw attention to the check, if you have to write on the back, the dates are at the back and side of the check.
- Handling checks correctly is key. Ask permission from your financial institution before doing anything with your checkbooks, particularly online stop payment.
![Picture of What Are SMART Goals? Examples and Templates [2026] • Asana](https://wordscr.com/post-images/how-to-write-a-check-100-featured.jpg "What Are SMART Goals? Examples and Templates [2026] • Asana")


")


 - wikiHow")

")


