The Ultimate Guide to the Best G Router Settings for Home Large Business Network
Introduction
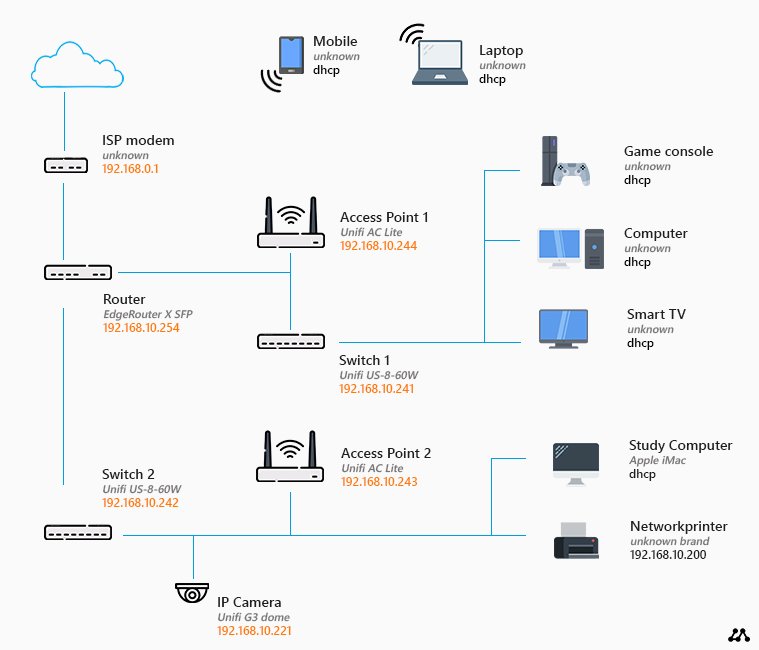
Furthermore, visual representations like the one above help us fully grasp the concept of Best G Router Settings For Home Large Business Network.
In today's digital age, a reliable and high-performance network is crucial for any business, large or small. With the increasing number of devices connected to the internet, optimizing your router's settings is essential to ensure a seamless and efficient network experience. In this article, we'll explore the best G router settings for home large business networks, helping you to maximize your network's performance, security, and overall productivity.Understanding the Importance of Router Settings

Setting Up the Best G Router for Home Large Business Network

As we can see from the illustration, Best G Router Settings For Home Large Business Network has many fascinating aspects to explore.
To get the most out of your G router, follow these simple steps: ### Step 1: Update Your Router's Firmware * Log in to your router's administrative interface using the default IP address (usually 192.168.0.1 or 192.168.1.1). * Look for the "Firmware Update" or "System Update" section and click on it. * Check for any available updates and follow the on-screen instructions to download and install the latest firmware. ### Step 2: Optimize Your Wi-Fi Settings * Log in to your router's administrative interface and navigate to the "Wireless Settings" or "Wi-Fi Settings" section. * Choose the "Wireless Mode" as "G" (802.11g) for maximum compatibility with devices. * Adjust the "Channel Width" to "Auto" to ensure optimal performance. * Set the "Channel" to "Auto" to automatically select the best channel for your network. ### Step 3: Configure Quality of Service (QoS) * Log in to your router's administrative interface and navigate to the "Quality of Service" or "QoS" section. * Enable QoS and configure it to prioritize critical applications and devices (e.g., video conferencing, online backups, and file transfers). ### Step 4: Set Up a Guest Network * Log in to your router's administrative interface and navigate to the "Guest Network" or "Guest Settings" section. * Enable the Guest Network feature to create a separate network for visitors or employees. * Configure the guest network settings, including the SSID, password, and access restrictions. ### Step 5: Secure Your Network * Log in to your router's administrative interface and navigate to the "Security" or "Firewall" section. * Enable WPA2 encryption and set a strong password for your network. * Configure intrusion detection and prevention, as well as any other security features your router supports. ### Step 6: Troubleshoot Connectivity Issues * Log in to your router's administrative interface and navigate to the "Troubleshooting" or "Support" section. * Run the built-in network diagnostic tools to identify and resolve connectivity issues. * Restart your router or modem as a last resort.


:max_bytes(150000):strip_icc()/3-5abcf226fa6bcc0036668782.png "Optimizing Network Setup for Google Home: Complete Guide for Seamless ...")

")
